Sunday, 5 October 2014

American Drugstore Haul


Some of my favourite YouTube videos to watch are Drugstore Hauls so I had a good idea of what was popular over in the States before I left for Florida. My main aim while I was there was to buy makeup that you can’t get in Ireland or makeup that was much cheaper than at home and I think I achieved that goal!

I made a drugstore wish list before I left and stayed pretty close to it, I don’t think I deviated too much. I bought my makeup in Target, Wallmart and CVS. I went into Wallgreens but it their prices were too high compared to the others. If you’re ever in the States then it’s really good to shop around as prices unlike Ireland can differ pretty dramatically from store to store.

I won’t be going into detail with everything as I will be doing individual posts in the coming weeks.
 
To start I bought some EOS lip balms and a hand cream. You can get these in Ireland in Harvey Nichols for around €6.00 but I got mine for $2.99 which is €2.40 so I bought 3 and a hand cream. They have a new flavour out in Coconut Milk which I bought as well as Summer Fruit and Pomegranate Raspberry. I love these, they’re just so moisturising and yummy.
 
I then went slightly bat shit crazy when I found the Milani stands in Walmart and CVS. We don’t get Milani here in Ireland but they are a very affordable makeup brand with some amazing quality shadows and blushes. The shadows I bought are from their new Bella range, which are a gel powder formula and are highly pigmented. I’ve only tested them out on the back of my hand so I’ll be excited to sit down and try different looks on myself. I’ve tried one blush and it’s pretty amazing, one little swipe of your brush and you have hell of a lot of product on it, I’m so impressed. I wish I could have gotten more but the shelves weren’t stocked very well in either stores but I think my boyfriend would have killed me if I got anymore.
 
I picked up some Maybelline pieces too. I love their 24 hour tattoo range so I got some pigments and a cream shadow, I also got their The Nudes palette which you can’t get here at all and the Eye Studio Color Plush Silk Eyeshadow quad in Copper Chic. I haven’t used any of these yet so I can’t tell you what I think but keep an eye out in the future for some reviews on them.
 
NYX recently came to Ireland within the last year but I haven’t been able to get near a store that sells it. I could have bought the whole stand when I was in Target but I managed to rein myself in and only get a few pieces. I had watched Sinead from The Beautiful Truth and her American haul before I left and fell in love when I saw her NYX blue liner so I had to pop one in the basket. Again I haven’t opened any of the products and the stores in America usually don’t have testers so you just have to hope you’ve picked a good colour.
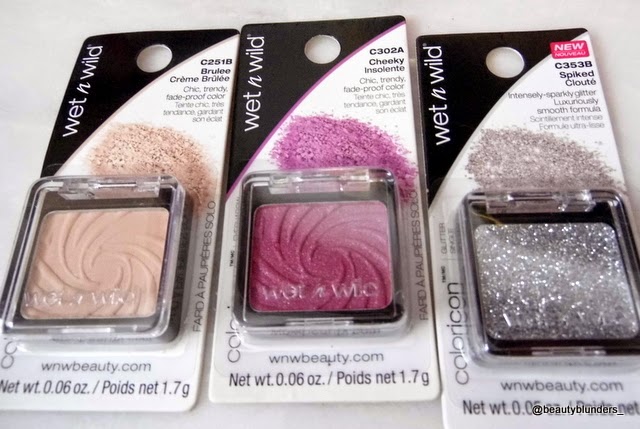
 
You can get Wet N Wild everywhere in Ireland now so I was only on the lookout if they had anything that I couldn’t get here, they didn’t have anything that caught my eye but they did have the single eyeshadows for only .94 cent which is so cheap when they’re basically €2 each here. They only had 3 colours left unfortunately but I will get use out of them.
 
This is another recommendation from The Beautiful Truth who raves about it. It’s an eye liner that also helps boost your lashes which is always a bonus. I’m not the best when it comes to putting on my liner so hopefully I’ll have good luck with this one.
 
Noting really caught my eye in L’Oreal but I did pick up a lip crayon that I don’t think is available in Ireland and one of their Infallible shadows. I’ve never used the shadows but I’ve heard amazing things about them that I’m sure I’ll love it.
 
 I also picked up some of the Revlon Colourstay foundations that I wear all the time. I love this makeup but its €17.79 in Boots so when I saw that it was $9.98 in Walmart I was all over it. I bought the shade Buff and Sand Beige. I was Buff before I left so I bought Sand Beige the next colour up so I’d have a darker colour for when I came back but that’s a little too pale for me know as well but I’m sure by Christmas I’ll be back to my pale self.
 
Finally I got this Burt’s Bees’ Lip Crayon, I just like the colour so it got thrown in the basket.

That’s all the drugstore makeup I bought, if I didn’t have my boyfriend giving me the stink eye I probably and most likely have bought an awful lot more.

Do you think I missed out on anything? Leave a comment below.

Thanks for reading.

Love Sarah xoxo

Friday, 3 October 2014

Victoria's Secret and Bath & Body Works Haul


In the first of what I think will be about 4 or 5 posts in total of all my goodies from my recent trip to Florida I’m starting off with Victoria Secret and Bath & Body Works.
If you don’t know already both companies are owned by the same people so I decided to put them together for this post.

To start we have Victoria Secret’s, I’m such a big fan and became hooked with the brand since my first trip to the states back in 2009. I even went over to London a few weeks after they opened their store there in 2012.

Each time I go I always stock up on their underwear and their fragrances as they always have offers on them. This time was no different, only this time I think I went a little over board with the sprays. They have offers of 5 for $30 which just can’t be ignored. The outlets have a Victoria Secret’s shop which have the same offer but the fragrances are from a season or two ago and are packaged differently, I bought my first 5 bottles here. I was then in the Florida Mall and went a bit cray there too, they had some fragrances that I don’t have already and they also had one that was a new release not included in the offer which was $5. I was also in the Miami VS and bought the little spray that was $10. I always buy the bundles as I sometimes include them in presents at Christmas. It’s also a great offer as single bottles are $14 each so I really feel like I need to buy them.

I also picked up this mini perfume set of all the perfumes that they have on offer, It was half price and I thought it would be great for having on nights out or when i'm going for weekends away.

I didn’t realise how many I bought though till I was packing, 13 in total I must be mad and I still have about 5 bottles at home from my trip to NYC last year that I still have to use up. I honestly do have a problem, but sure least I’ll smell good. I think I’ll have to have one in my bag and at my desk just to help use them up.


Now each time I’ve been to the states I’ve managed to stay away from Bath & Body Works but this time I made it into one. Basically they sell amazing candles, soaps, bath and shower gels and basically everything else that you’d want to keep you looking and smelling great after a wash. Like VS they too had a store in the outlets. I bought some candles from Christmas last year and they also had new season candles as well. For some reason I bought 5 hand sanitizers but they were on offer and I had 3 in my hand so I obviously had to get two more so I could get the offer.


As it is “Fall” everything is pumpkin flavour, the Yanks go crazy for it. I haven’t tried all the candles I’ve only lit the Sea Salt and Maple Popcorn flavour and since I have my house smells like freshly cooked biscuits which makes you insanely hungry, people are coming into my house drooling and expecting cookies. I might give one or two of the candles away at Christmas as well but they all smell so amazing I think it will be hard to let any of them go, they all smell so sweet and wintery they really put you in the mood for an open fire, dark nights and cups of hot chocolate!


Whatever about needing Victoria Secrets in Dublin we most definitely need a Bath and Body Works! Yankee Candles have nothing on these guys and they’re cheaper J
 I wish there was a way of you guys smelling everything I bought so you can get an idea of why I love the 2 stores so much.

Thanks for reading.

Love Sarah xoxo


Wednesday, 1 October 2014

Vamp Up Your Lips With Makeup Revolution


Since I heard about Makeup Revolution I have been super obsessed with their products. They are so affordable and have some great dupes for some big brands like Urban Decay and their Naked Palettes. I had recently discovered that their Velvet Matte Lip Lacquers are great dupes for the Lime Crime Velvetine lip lacquers.

They have recently released new colours and they are perfect for the coming winter and most importantly for Halloween.

The colours are:

Depravity (Purple)


Rebel (Pinky Red)


Vamp (Deep Dark Purple)


Black Heart (Pure Black)


The colours are so pigmented and last for such a long time. When applied they dry pretty quickly onto the lips and don’t bleed. They’re not the type of lippies that can just be thrown on, as they’re so pigmented you do need to take your time when applying them.

I will definitely be wearing these at some stage over the next few months. They aren’t the most day time friendly colours but I think I’ll get some wear out of them. The colour Depravity I think is my favourite, I’ve never worn a colour like this and I think it actually suits me.

These lip lacquers are such a bargain at only £3.00/€3.59.

If you want to find out more head over to Makeup Revolution, I’m sure you’ll love their site as much as I do.

Thanks for reading.

Love Sarah xoxo


Friday, 26 September 2014

Guest Post with Bright With Delight - Nail Tutorials

As I'm away at the moment I asked my friend Karen to do a guest post for myself. I love guest posts they're a great way of checking out new bloggers. Today Karen will be showing you some great nail tutorials, she's awesome at them!
I hope you love her as much as I do :)

So I've known Sarah for 3 years now and she is the main person who inspired me to keep blogging! I feel so lucky to have her as a friend and I am delighted she has asked me to be a guest on her fabulous blog while she's away living the life in Florida! #welljell, so I've put together a trio of Nail tutorials were you can create the designs yourself in 5 or less simple steps.

I used fake nails because my nails are a bit short at the moment and I prefer working with longer nails anyway so its win-win situation LOL.

These are all the materials needed…


These nails are GREAT! I got them in Penneys for €1.50, bargain I know! I got the nude ones because they are easier to paint over. I picked out different nail sizes and stuck them on a nail wheel with blue tack so they would be easier to paint.


First design: The 'Yin-Yang' 

Step one: Paint the nail using a thick white polish. I used a 'Barry M' white and did 3 coats. Some whites can be watery so make sure you do enough coats to make sure no other colours are popping through. 


Step two: I got a brush and painted the swirl of the yin-yang on the nail using black acrylic paint. 


Step three: When this dried in I painted one half of the nail black.


Step four: I then got a black and white dotting tool and made a big dot in the opposite colour from the half I was painting. 

Step five: Wait until dry and apply a clear top coat 


Second design: 'Aztec'

Step One: Using a thin brush, paint two or three (depending on the length of your nail) black lines going across the nail. Don't worry if it's a tad messy we can fix it up later ;) 

Step Two: Fill in the marked off boxes with whatever colour you like. I chose an aqua green and reddish colour.


Step Three: Go over the black lines you originally painted and now try make them as straight as you can.


Step Four: Using black and white dotting tools and brushes design the colours you just painted with dots, lines, zigzags whatever you like. Get creative and make it your own! I went simple and just painted zig zags and polka dots. 

Step Five: Wait till dry and apply a clear top coat.


Third design: 'Cheetah Print' #RAWR


Step One: Pick the colour/colours you want the cheetah dots to be. Make a few scattered dots (not too thick) all over the nail. Don't be afraid to mess up because it's all trial and error and about seeing what works and what doesn't.

Step two: Make little semi-circles using a black dotting tool around the coloured dots. It looks better if the semi-circles don't meet and there's a gap between them.

Step Three: Fill in the rest of the nail with little black squiggles and dots. 

Step Four: Wait till dry and paint with a clear coat.


The end result looks a little something like this...


I would love if you tried out some of these designs and tagged me on Instagram @brightwithdelight or on twitter @karenmccord94 .

Stay tuned to my Instagram account as I will be posting a short video on how to create these and more nail designs!


Wednesday, 24 September 2014

Maxfactor Gel Shine Lacquer


I was recently sent these gorgeous Maxfactor Gel Shine Lacquer polishes. They are “high shine and intense colour that lasts, for an instant glamour transformation”.

These polishes claim to give “intense colour pay-out with high shine and up to 7 days wear”.

I am immediately drawn to any polishes that have gel in the title or promises to give the same results as any UV gel polish.

I didn’t test all the colours unfortunately, I didn’t manage to try the brighter colours before I got Shellac on my nails. I had Sheen Merlot on my nails for over a week though so I think I have a good idea of how they work.
 
I chose Sheen Merlot (Burgundy) over Vivid Vermillion (Neon Orange) and Twinkling Pink (Bright Fuchsia) as I am forever drawn to plums and reds.

It does have a very high colour pay out as it didn’t take too much for the nail to be completely covered without seeing any of the nail bed. By the end of the week I only had one or two chips which I was really impressed by.

The only thing I was disappointed by was the fact that I didn’t seem have a very gel like finish. It could have been that colour though because I did swatch the other colours and they did seem a bit thicker on the nails than Sheen Merlot.

I did love the colour I tested and while it didn’t have too much of a gel look it was very pigmented and did last for almost a full week which I was really impressed by. They retail for €10.39 each.

Do you think you’ll buy them?

Thanks for reading.

Love Sarah


Tuesday, 23 September 2014

Bourjois Color Boost Lip Crayon

I could have sworn I had written this post already but I can’t find it anywhere so here we go with round two!

I was drawn to the Bourjois Color Boost Lip Crayon as it says on the packaging that it is waterproof, it’s also hydrating and has an SPF of 15.

The lipstick was put through its paces, I really wanted to know whether it would live up to being waterproof or not.

I would say it is waterproof, I drank plenty of water and coffee while wearing it and while some colour did come off onto my glass and cup they lipstick didn’t come off at all. However when it came to eating it came completely off but we can’t have it all can we.


I got mine in the colour Fuschia Libre, it’s a lovely bright pink. The finish of the Color Boost Lip Crayons are almost gellish, it’s doesn’t have the stickiness of a gloss but still gives off that appearance, which I love because I hate sticky lip glosses.

These cost €10.99 each, I’m not sure I’ll buy them again. They are a nice lipstick but I only liked it, I didn’t love it.

Thanks for reading.

Love Sarah xoxo

Monday, 22 September 2014

Maxfactor Skin Luminizer Foundation


I was lucky enough to be sent the new Maxfactor Skin Luminizor Foundation a few weeks ago and I’ve been testing it out like mad since.

This is a medium coverage foundation that has reflective pigments to give the skin a subtle glow. The foundation has been created to give a healthy glow that evens out and perfects skin-tone and imperfections.

The packaging is quite nice, I love how you can see how much product you have left as the bottle is clear and it has a pump which is always nice and handy.

I have oily to combination skin and found that the formula gave a matte to semi-matte finish. I’m not a fan of dewy finishes but I did like this finish as it gave more of a natural glow than my usual oily shine.

I did have some problems with application, I found it very hard to get a good coverage on the skin. I used my Real Techniques and Sigma foundation brushes and neither of them worked out great. I love to buff makeup into my skin to give it a smooth coverage but I found the more I buffed the more the foundation moved. After neither of those brushes working I gave up and decided to use the tools God gave me, I put the foundation on with my fingers and it gave a much better result. I still found that it started to move around my face into patches. It’s as if it dries too quickly which makes it difficult to give a smooth coverage and the look that you’re not wearing any makeup.
I ended up buying a blender sponge, I dampened the sponge and I think the fact that it was going on damp that it didn’t dry as quickly so it made the application that little bit smoother.

I also tried it with different primers and found that Smashbox Photo Finish primer was the best.

I think that this foundation would suit people with oily skin, my cheeks are a lot drier than the rest of my face and it did dry into the skin making it very noticeable.

It does say it perfects skin tone which I did find to be true, I can be very red cheeked at times and it evened out my skin tone perfectly. It claims to be a medium coverage foundation but I found it to be more on the sheer side, I don’t know if I’m just too used to higher coverage foundations but for me it didn’t seem to be a medium coverage.

The colour however did suit my skin tone amazingly, I received mine in Light Ivory, to put that into context I’m NW15 in MAC foundations.

If I’m honest I probably wouldn’t buy this if I saw it in Boots, it’s pretty pricey at €17.00 and I would be raging if I did spend my money on it and it not work with my foundation brushes. I give the Maxfactor Skin Luminizer Foundation a 6/10. 

Have any of you tried it, if so tell me what you think about it.

Thanks for reading.


Love Sarah xoxo