Friday 26 September 2014

Guest Post with Bright With Delight - Nail Tutorials

As I'm away at the moment I asked my friend Karen to do a guest post for myself. I love guest posts they're a great way of checking out new bloggers. Today Karen will be showing you some great nail tutorials, she's awesome at them!
I hope you love her as much as I do :)

So I've known Sarah for 3 years now and she is the main person who inspired me to keep blogging! I feel so lucky to have her as a friend and I am delighted she has asked me to be a guest on her fabulous blog while she's away living the life in Florida! #welljell, so I've put together a trio of Nail tutorials were you can create the designs yourself in 5 or less simple steps.

I used fake nails because my nails are a bit short at the moment and I prefer working with longer nails anyway so its win-win situation LOL.

These are all the materials needed…


These nails are GREAT! I got them in Penneys for €1.50, bargain I know! I got the nude ones because they are easier to paint over. I picked out different nail sizes and stuck them on a nail wheel with blue tack so they would be easier to paint.


First design: The 'Yin-Yang' 

Step one: Paint the nail using a thick white polish. I used a 'Barry M' white and did 3 coats. Some whites can be watery so make sure you do enough coats to make sure no other colours are popping through. 


Step two: I got a brush and painted the swirl of the yin-yang on the nail using black acrylic paint. 


Step three: When this dried in I painted one half of the nail black.


Step four: I then got a black and white dotting tool and made a big dot in the opposite colour from the half I was painting. 

Step five: Wait until dry and apply a clear top coat 


Second design: 'Aztec'

Step One: Using a thin brush, paint two or three (depending on the length of your nail) black lines going across the nail. Don't worry if it's a tad messy we can fix it up later ;) 

Step Two: Fill in the marked off boxes with whatever colour you like. I chose an aqua green and reddish colour.


Step Three: Go over the black lines you originally painted and now try make them as straight as you can.


Step Four: Using black and white dotting tools and brushes design the colours you just painted with dots, lines, zigzags whatever you like. Get creative and make it your own! I went simple and just painted zig zags and polka dots. 

Step Five: Wait till dry and apply a clear top coat.


Third design: 'Cheetah Print' #RAWR


Step One: Pick the colour/colours you want the cheetah dots to be. Make a few scattered dots (not too thick) all over the nail. Don't be afraid to mess up because it's all trial and error and about seeing what works and what doesn't.

Step two: Make little semi-circles using a black dotting tool around the coloured dots. It looks better if the semi-circles don't meet and there's a gap between them.

Step Three: Fill in the rest of the nail with little black squiggles and dots. 

Step Four: Wait till dry and paint with a clear coat.


The end result looks a little something like this...


I would love if you tried out some of these designs and tagged me on Instagram @brightwithdelight or on twitter @karenmccord94 .

Stay tuned to my Instagram account as I will be posting a short video on how to create these and more nail designs!


Wednesday 24 September 2014

Maxfactor Gel Shine Lacquer


I was recently sent these gorgeous Maxfactor Gel Shine Lacquer polishes. They are “high shine and intense colour that lasts, for an instant glamour transformation”.

These polishes claim to give “intense colour pay-out with high shine and up to 7 days wear”.

I am immediately drawn to any polishes that have gel in the title or promises to give the same results as any UV gel polish.

I didn’t test all the colours unfortunately, I didn’t manage to try the brighter colours before I got Shellac on my nails. I had Sheen Merlot on my nails for over a week though so I think I have a good idea of how they work.
 
I chose Sheen Merlot (Burgundy) over Vivid Vermillion (Neon Orange) and Twinkling Pink (Bright Fuchsia) as I am forever drawn to plums and reds.

It does have a very high colour pay out as it didn’t take too much for the nail to be completely covered without seeing any of the nail bed. By the end of the week I only had one or two chips which I was really impressed by.

The only thing I was disappointed by was the fact that I didn’t seem have a very gel like finish. It could have been that colour though because I did swatch the other colours and they did seem a bit thicker on the nails than Sheen Merlot.

I did love the colour I tested and while it didn’t have too much of a gel look it was very pigmented and did last for almost a full week which I was really impressed by. They retail for €10.39 each.

Do you think you’ll buy them?

Thanks for reading.

Love Sarah


Tuesday 23 September 2014

Bourjois Color Boost Lip Crayon

I could have sworn I had written this post already but I can’t find it anywhere so here we go with round two!

I was drawn to the Bourjois Color Boost Lip Crayon as it says on the packaging that it is waterproof, it’s also hydrating and has an SPF of 15.

The lipstick was put through its paces, I really wanted to know whether it would live up to being waterproof or not.

I would say it is waterproof, I drank plenty of water and coffee while wearing it and while some colour did come off onto my glass and cup they lipstick didn’t come off at all. However when it came to eating it came completely off but we can’t have it all can we.


I got mine in the colour Fuschia Libre, it’s a lovely bright pink. The finish of the Color Boost Lip Crayons are almost gellish, it’s doesn’t have the stickiness of a gloss but still gives off that appearance, which I love because I hate sticky lip glosses.

These cost €10.99 each, I’m not sure I’ll buy them again. They are a nice lipstick but I only liked it, I didn’t love it.

Thanks for reading.

Love Sarah xoxo

Monday 22 September 2014

Maxfactor Skin Luminizer Foundation


I was lucky enough to be sent the new Maxfactor Skin Luminizor Foundation a few weeks ago and I’ve been testing it out like mad since.

This is a medium coverage foundation that has reflective pigments to give the skin a subtle glow. The foundation has been created to give a healthy glow that evens out and perfects skin-tone and imperfections.

The packaging is quite nice, I love how you can see how much product you have left as the bottle is clear and it has a pump which is always nice and handy.

I have oily to combination skin and found that the formula gave a matte to semi-matte finish. I’m not a fan of dewy finishes but I did like this finish as it gave more of a natural glow than my usual oily shine.

I did have some problems with application, I found it very hard to get a good coverage on the skin. I used my Real Techniques and Sigma foundation brushes and neither of them worked out great. I love to buff makeup into my skin to give it a smooth coverage but I found the more I buffed the more the foundation moved. After neither of those brushes working I gave up and decided to use the tools God gave me, I put the foundation on with my fingers and it gave a much better result. I still found that it started to move around my face into patches. It’s as if it dries too quickly which makes it difficult to give a smooth coverage and the look that you’re not wearing any makeup.
I ended up buying a blender sponge, I dampened the sponge and I think the fact that it was going on damp that it didn’t dry as quickly so it made the application that little bit smoother.

I also tried it with different primers and found that Smashbox Photo Finish primer was the best.

I think that this foundation would suit people with oily skin, my cheeks are a lot drier than the rest of my face and it did dry into the skin making it very noticeable.

It does say it perfects skin tone which I did find to be true, I can be very red cheeked at times and it evened out my skin tone perfectly. It claims to be a medium coverage foundation but I found it to be more on the sheer side, I don’t know if I’m just too used to higher coverage foundations but for me it didn’t seem to be a medium coverage.

The colour however did suit my skin tone amazingly, I received mine in Light Ivory, to put that into context I’m NW15 in MAC foundations.

If I’m honest I probably wouldn’t buy this if I saw it in Boots, it’s pretty pricey at €17.00 and I would be raging if I did spend my money on it and it not work with my foundation brushes. I give the Maxfactor Skin Luminizer Foundation a 6/10. 

Have any of you tried it, if so tell me what you think about it.

Thanks for reading.


Love Sarah xoxo

Tuesday 16 September 2014

Florida Drugstore Wishlist


While I’m dying to get to Sephora (You can read my Sephora Wishlist here) I really can’t wait to do some damage in Wallmart, CVS, Wallgreens and more for some drugstore bargains.

There’s a few brands that you just can’t get here and there’s some items that aren’t available here yet.

As far as I’m aware you can’t get these Maybelline Eye Studio Color Plush quads in Ireland and the colours in them are really something else.

Another Palette from Maybelline that you can’t get here is The Nudes Palette. I’ve heard good things about them and seen some amazing tutorials with it being used. It’s only $10.00 so I might buy one or two as stocking fillers.

The Jordana Best Lash mascara is less than $2.00 and is used in nearly every Lauren Curtis tutorial, one of my favourite YouTubers. I haven’t heard any other recommendations from the brand but I’ll definitely be trying this one out.
 
NYX has recently arrived in Ireland but I have yet to get my hands on any of their products so I’ll be going a bit crazy buying some of the items in their collection. I can’t wait to get the blushes, the Lip Butters, some of their primers, eyeshadow palettes and so much more.
 
After watching Americas Next Top Model I’ve always wanted to try Covergirl, I haven’t really decided what to get from them but the concealer sticks I think will be good for contouring so I might buy some of them.
 
Yet another Maybelline product, the Age Rewind concealer. I’ve been trying to get my hands on this for months but they never have it in the shade I need so fingers crossed I’ll be able to get it when I’m in Florida.
 
We can get Physicians Formula in Ireland but I haven’t managed to get my hands on a lot of their products yet. This recommendation comes from Sinéad over at The BeautifulTruth. It’s supposed to a really long wearing and easy to use and I need all the help I can get when it comes to eyeliner.
I’ve only ever seen Ardell Lashes at beauty shows, so if you know where you can buy them in Dublin please let me know! I love the Demi Wispies so I’ll be stocking up on them as they’re my favourite lashes ever.
 
Hands down Milani Cosmetics is the main reason I’ll be going wild when I get to the drugstores! Milani blushes and shadows are, from what I hear, the most amazing products to ever come from the drugstore beauty aisles. I hope they live up to the hype!
 
If you have any recommendations on what else I should buy in the drugstores then I want to know!

Thanks for reading.

Love Sarah xoxo

Monday 15 September 2014

Sephora Wishlist


Sephora won’t know what hit it when I touch down in Orlando! Every time I go to the states I have to go to Sephora, they just have so many brands of makeup and skincare that we can’t get in Ireland and in some cases not even in the UK. I’ve picked out some of the items that I can’t wait to get my hands on, I’m sure more will be going into the basket but for now these are the beauty products that will be definitely coming back to Dublin with me.

Sephora have their own brand of makeup as well as selling other brands. This Color Festival Blockbuster palette has 72 eyeshadows, 28 lip glosses, 8 blushes, 18 cream eyeliners and 4 2 in 1 cheek and lip creams all for the tidy sum of $49.50. It might seem expensive but for all you get it’s a bargain!

Sephora are great for their value packs, usually containing a mixture of travel, deluxe size and sometimes full size products from their own brand and high end lines. I have my eye on Glitz & Glam pack containing Stila, Smashbox, Benefit and Makeup Forever minis as well as some other brands. I think the value packs is where I’ll do the most damage.


I love my Anastasia Beverly Hills brow powder duo so I can’t wait to get my hands on the Brow Wizz, the Brow Gel and the Dipbrow Pomade. They are some of the best brow products and I’ll be stocking up on the brand as it’s much cheaper to buy it in Sephora then back in Dublin.


I don’t know if I need the Beauty Blender but what I do know is that I want it in my life. From what I’ve seen it makes foundation application that much easier and quicker.


I’ve heard such good things about the Kat Von Dee makeup especially the Lock It Foundation and concealer. They’re longwearing which is my favourite kind of foundation so I hopefully I can find the right shade for my skin tone.

I know you can get the Glam Glow muds much more easily in Dublin now but with the exchange rate it might be a bit cheaper in the states so I’ve been holding off getting it until now.

The Stila Magnificent Metal Foils are another item that I can get in Dublin but it costs €44.00 here and only $32.00 which with the exchange rate is only €25.00. I’ll probably only be getting one of these, €25.00 is still pretty expensive for just one eyeshadow.


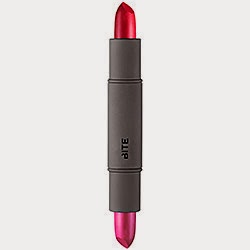
Bite is a brand that’s been on my radar for a while from watching all the American YouTube bloggers. I’ll be getting the Agave Lip Mask and the Luminous Cream Duo Lipsticks. The mask helps rejuvenate your lips and can be used as an overnight treatment for them to keep them in tip top condition. The Duo lipsticks are only $12.00 and for that price I just can’t say no to that!

Marc Jacobs makeup is exclusively sold at Sephora and I can’t wait to get my hands on one of the eyeshadow palettes. As you can imagine it is an expensive brand but we all deserve a bit of glam in our lives.


Make Up For Ever have recently come out with a new line of shadows and from the reviews I’ve seen they are amazing. They’re called the Artist Shadows and can be bought in singles or you can make up a palette of your favourite colours.


There’s a few Urban Decay items that I have my eye on but I really want to try their new Perversion Mascara and you can buy a value pack in Sephora that includes the a deluxe sample of the Subversion Mascara primer.
 

Finally the Smashbox Full Exposure Travel Palette is a miniature of the Palette that was out last year. I’ll have to see what it’s like when I’m in the store because I thought the original Full Exposure palette seemed a bit chalky but the palette is only $22.00 so I think I can manage chalky for that price.

That concludes my Sephora wish list, I’m sure I’ll come back with so much more but for the moment these are the main things I’ll be buying.

Thanks for reading.

Love Sarah

Sunday 14 September 2014

Penneys Haul

If you don’t know already I’m heading off to Florida on Wednesday. I’ve been saving like mad but I popped into Penneys yesterday and the whole spending ban kind of went of the window. I did buy stuff for the hols and a lot of it was on sale, all those €3’s seem to add up very quickly though!

When I went in I went over to the sale rail as they were selling off their summer clothes. I grabbed this striped maxi dress which was only €3.00. I love the spaghetti straps, I’m just hoping the horizontal stripes don’t make me look huge.


I then found this denim dress for €7.00. It’s a light fabric which will be great in the heat and love how it’s a bit longer at the back.


The denim shorts weren’t in the sale but I couldn’t resist, I haven’t tried them on yet so fingers crossed they look alright on me. These where €13.00.


I have a few sandals and runners for the holidays but these cute little runners where only €4.00 and looked very summery. Fingers crossed they don’t cut the feet off me walking around the parks.


I then went round to the beauty section which is where I think I did the most damage.

I picked up this roller ball perfume for €2.50, I’d never seen it before and thought it’s cheap enough that if I didn’t like it then it won’t have caused too much of a dent in my purse. It’s a lovely fresh yet musky scent but you need to get close to it to get a proper sniff of it.


These revitalising eye pads looked really interesting, I can’t wait to see use them. If they work out good I might bring them to use them on the plane.


I then got these toothbrush holders, I just thought they were handy to put on my toothbrush and chuck into my case.


I don’t need any more nail polishes but it wouldn’t be a haul for me if there wasn’t some nail polish in the mix. I couldn’t say no to this little box of 12 mini polishes just look how cute they are and only €3. I think they’re for children but I’m a big kid and just couldn’t resist.


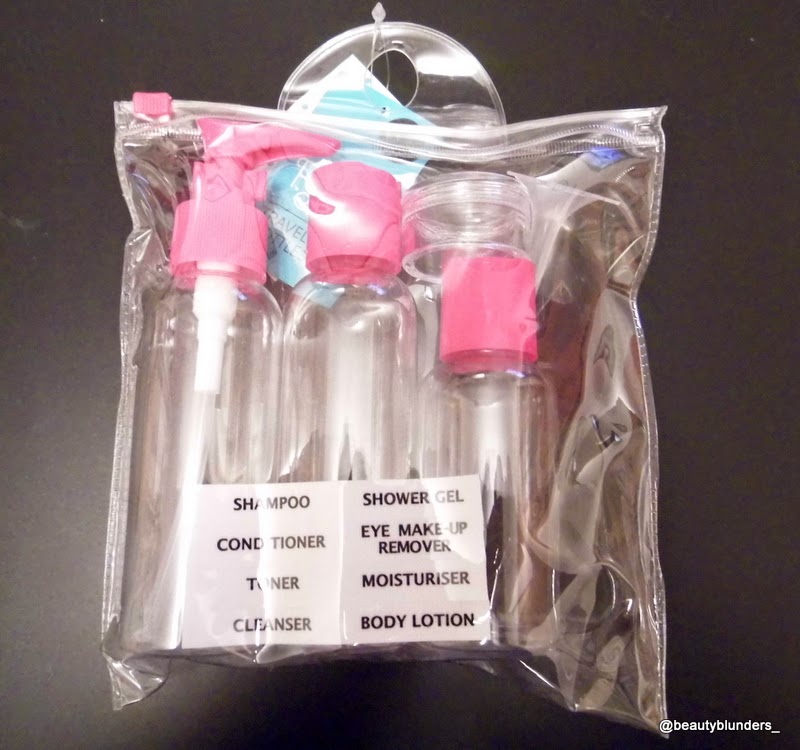
I’m trying not to pack so much and I know my skincare will take up the most space in my bag so I had to get these travel bottles to but my face wash and creams into, these where only €1.50.


To save even more space I got these oil balancing wipes to take off my makeup, I usually use a cleansing oil to take my makeup off but I think that will be too messy to bring the oil with me so I’ll use the wipes to take off the first layer of makeup and then go in with my usual routine. These where only €1.50 for a two pack – bargain!


I don’t know when I’ll use these but these lashes where only 50 cent each.


This ombre polish topcoat was really intriguing to me. You put different layers on your nails and it creates a graduated look. It was only €3.49 and I can’t wait to try it out when I take my Shellac off to see if it works.


I’ve been trying out a foundation that will be in an upcoming review and it hasn’t really worked with any of my foundation brushes so I decided to get a blender to try something new. It’s only €1.50 so we’ll see if it makes a difference.


Finally I got this PS Love Beauty lipstick, I got it because I don’t think I have this colour from their collection. It’s only €2.00 and smells like the fizzy stuff inside of a Refresher bar.

That’s it, I bought one or two things extra like socks and boring stuff like that. Just have to pack up everything now and I’ll be all set J